Popular Varieties: Anaheim, Ancho, Black Hungarian, Cayenne, Habañero, Jalapeño, Large Red Cherry, Orange Habañero, Pimento, Poblano, Red Cherry, Serrano, Tabasco, Thai Hot, Yellow Wax.
 |
| Capsicum |
Chillies, also known as peppers, are among the most versatile crops you can grow — used in cuisines, sauces, and spice blends around the world. Whether you’re growing them for home use or commercial production, success depends on proper soil preparation, ideal temperature, pest management, and post-harvest handling.
🌱 Germination & Growing Conditions
-
Sowing Depth: ¼ inch deep in a well-drained starting medium.
-
Temperature: Seeds require warm conditions (25–30°C) for successful germination.
-
Tip: Use a heat mat to maintain consistent warmth during germination.
Once seedlings emerge, ensure plenty of light. A south-facing window or artificial grow lights will help prevent weak, leggy plants.
 |
| Bacterial spot |
➡️ Transplanting:
Move your chilli plants outdoors 2–3 weeks after the last frost, once the soil has warmed above 10°C and the weather is stable. Avoid transplanting too early — chillies dislike cold soil and fluctuating temperatures.
 |
| Powdery mildew |
🌞 Site & Soil Preparation
-
Sunlight: Choose a spot that receives 6–8 hours of full sunlight daily.
-
Soil: Fertile, lightweight, slightly acidic (pH 5.5–7.0), and well-drained soil is ideal.
-
Spacing:
-
12–24 inches apart in rows 24–36 inches apart, or
-
14–16 inches apart in raised beds.
-
Avoid planting chillies in soil that recently grew tomatoes, potatoes, or other members of the nightshade family, to prevent soil-borne diseases.
 |
| Southern blight |
💧 Watering & Fertilization
Chillies thrive with a steady, moderate supply of water.
-
Overwatering can cause root rot, while underwatering can lead to blossom drop.
-
Use mulching (like black plastic or organic compost) to retain soil moisture and warmth.
 |
| Flea beetle |
Fertilization Tips:
-
Use organic fertilizers rich in phosphorus, potassium, and calcium.
-
Avoid excess nitrogen, which promotes leaf growth at the expense of fruiting.
-
Stake tall varieties to prevent lodging and support heavy fruit loads.
 |
| Leafminers |
🐛 Common Pests and Diseases
Chilli plants can be affected by several pests and diseases. Regular monitoring and preventive care can help ensure a healthy crop.
🦠 Diseases
-
Bacterial Spot: Brown lesions on leaves, stems, and fruits.
-
Damping-Off: Seedlings collapse due to fungal infection near the soil line.
-
Powdery Mildew: White, powdery patches on leaves leading to curling and yellowing.
-
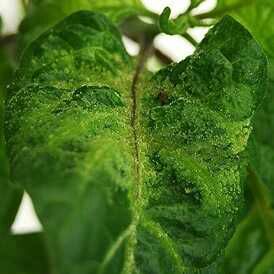
Mosaic Virus: Mosaic-like light and dark green leaf patterns; distorted leaves.
-
Fusarium Wilt: Yellowing and wilting of leaves, red-brown vascular tissue.
-
Phytophthora Blight: Black lesions on stems, wilting plants, gray-brown leaf spots.
-
Southern Blight: Sudden wilting; browning of stems covered with white fungal mats.
🐞 Pests
-
Beet armyworms
-
Flea beetles
-
Leafminers
-
Aphids
-
Tomato fruit worms (corn earworms)
-
Leafrollers
-
Pepper weevils
-
Thrips
-
Spider mites
-
Cabbage worms
Tip: Use integrated pest management (IPM) — including neem oil sprays, crop rotation, and natural predators — to minimize chemical pesticide use.
 |
| Cabbage worm |
🍃 Flowering & Fruit Set
Chillies are sensitive to temperature extremes:
-
Night temperatures below 15°C or above 23°C can reduce fruit set.
If flowering drops due to heat or cold stress, provide shade or temperature control if possible.
 |
| Tomato fruit worm |
🌶️ Harvesting
-
Peppers typically start green and can be harvested at this stage or left to ripen to red, yellow, or orange — depending on the variety.
-
Harvesting early encourages more frequent flowering and fruiting, but flavor may vary.
-
Always use scissors or garden snips to harvest — pulling by hand can damage the plant.
 |
| Pepper weevil larvae |
☀️ Drying and Storage
To preserve your chillies for longer use, drying is essential.
Drying Methods:
-
Food Dehydrator: Fast and consistent drying.
-
Oven Drying: Place chillies on a tray and bake at ~50°C for several hours, turning occasionally.
-
Sun Drying: Spread chillies in a sunny, dry area and turn regularly for even drying.
Once chillies are dry and brittle, store them in airtight containers in a cool, dark place. Properly dried chillies can last up to a year.
 |
| Pepper weevil |
🌾 Saving Seeds for Next Season
-
Cut open a ripe pepper and remove the seeds.
-
Spread them on a paper towel to dry for 24 hours.
-
Label and store in a cool, dark place inside a plastic or paper bag.
Properly stored seeds remain viable for up to 2–3 years.
✅ Final Tips for Successful Chilli Farming
-
Rotate crops annually to avoid soil diseases.
-
Use raised beds or containers for better drainage.
-
Monitor regularly for early signs of pests or disease.
-
Provide consistent moisture and sunlight.
-
Enjoy the process — chillies are rewarding and vibrant plants that add spice to both your garden and your kitchen!
🌿 Conclusion
Chilli farming is both an art and a science. With the right care — from seed to harvest — you can grow a healthy, high-yield crop bursting with flavor and heat. Whether you’re cultivating for commercial production or home gardening, these steps will help ensure success every season.

Comments
Post a Comment